How to enable MacFuse/PCloud Drive on Mac Sonoma 14.2.1
I recently upgraded to Mac Sonoma 14.2.1 and MacFuse stopped loading which affected my ability to load PCloud and NTFS drives. I spent a few days trying to troubleshoot everything and in the end it turned out I had to disable Mac System Integrity Protection to get everything to load. I’m sharing in case it helps anyone else.
To disable SIP on your Mac Sonoma for extensions like MacFuse and pCloud Drive:
- Shut down your Mac: Turn off your Mac completely by pressing and holding the power button until the screen goes black.
- Restart in Recovery Mode: Enabling Recovery Mode depends on your Mac. You can try the steps below or follow Apple’s guide here.
Power on your Mac and immediately press and hold Command (⌘) + R to enter Recovery Mode.
Power on your Mac and hold the power button down until Other Options displays. - Open Terminal: In Recovery Mode, select “Utilities” in the macOS Utilities window and select “Terminal.”
- Disable SIP: Type
csrutil disable
in Terminal and press Enter. This disables System Integrity Protection (SIP). - Restart Mac: Click the Apple menu and select “Restart” to reboot your Mac with SIP disabled.
- Re-enable SIP (if needed): Follow the same steps but use
csrutil enable
in Terminal to re-enable SIP.
Note: Disabling SIP poses security risks. Re-enable it once you’ve installed the necessary extensions. Only disable SIP when necessary and understand the potential risks involved.
Installing font awesome pro with bun
After recently switching to bun.sh, I was trying to install Font Awesome Pro. It uses a private registry but their docs have not been updated to support non-npm package managers and bun does not yet support .npmrc files.
You can configure a private registry using an organization scope. First, you must get your auth token from your paid Font Awesome account by going to your account page, scrolling down to the Tokens section, and copying the token.
Copy and paste this string, and replace YOUR_TOKEN_HERE with the token you copied above:
[install.scopes]
"@fortawesome" = { token="YOUR_TOKEN_HERE" , url =
"https://npm.fontawesome.com/"}
Open the terminal and enter these commands:
touch $HOME/.bunfig.toml
nano $HOME/.bunfig.toml
Paste in the config above with your token and then hit CTRL+X to quit, and Y to save when prompted. Now you should be able to run
bun add @fortawesome/fontawesome-pro
How to Delete Folder with Special Character in Windows 10/11
I ran into an issue where a folder was created by some application with a special Unicode character that Windows Explorer doesn’t seem to play nicely with. I also was unable to tell what the character was since nothing would reveal it. The folder’s there, but you can’t rename or delete it. If I tried to remove or delete it, I’d get an error saying the folder doesn’t exist:
I have LockHunter installed but it wasn’t able to delete it for some reason. The easiest way I found to delete the folder was to use Git Bash and then use the appropriate commands to rename or delete the folder.
Browse to the folder where the offending folder is located. For example purposes, I’ll use c:\temp\folder1
cd c:/temp
Rename:
mv fol (hit tab to autocomplete) folder1
Delete:
del fol (hit tab to autocomplete)
If you don’t have Git Bash or are not a developer/power user, you can download the portable version from https://git-scm.com/download/win to use temporarily. Once you decompress the files to a folder, you’ll find git-bash.exe which you can double-click to run and use the above commands.
Windows 7 & 10 How to Bulk Unblock Blocked Files
While setting up a new computer, Windows was throwing up warnings that files transferred from a backup drive might be unsafe. The files were text and images, so the warnings were safe to ignore but the directory had over one thousand files. Rather than unblocking each file manually, Windows PowerShell makes it easy to unblock files in bulk.
Load up Windows Powershell:
- Press Win + R on the keyboard to open the Run dialog.
- In the Run box, type powershell
For one folder without subdirectories, this snippet will do the trick.“$env:userprofile\Downloads“ tells PowerShell to use the Download folder for the logged in user and unblocks all files in it. Change this to the folder path you need if it’s not the Downloads folder.
get-childitem “$env:userprofile\Downloads“ | unblock-file
If you have sub-directories and need to unblock everything, use the -Recurse flag:
dir “$env:userprofile\Downloads“ -Recurse | Unblock-File
Want to see a report of files to be unblocked before running it? The -WhatIf flag will show you without executing.
dir “$env:userprofile\Downloads“ -Recurse | Unblock-File -WhatIf
How to Fix ‘Converter Failed to Save File’ with Excel 2016
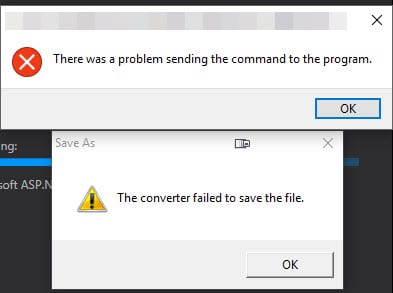
I recently upgraded to Office 2016 on my Windows 10 desktop and was getting the error “Converter failed to save file” when double clicking on the file along with an “There was a problem sending the command to the program error” every time. I finally had enough with the annoyance to troubleshoot it and figured out a solve.
If you have the same issue, here’s how to fix it:
- Open your Default Programs configuration from the Control Panel. On Windows 10, you can hit start, type Default Programs, and it’ll open the app.
- Scroll down the list until you get to the Excel formats (XLS):
- If you see anything other than Excel as the default, you’ll need to change the default to Excel. For me, the issue was the Open XML Converter not being installed anymore after upgrading to 2016. To change the default, select the format, click the “Change Program” button and select Excel 2016 from the list of apps that pops up and click OK to set the association:
- You’ll need to do this for each format in the list to correct it. The most common formats you’ll use are XLS, XLSX, & XLT.
ReportCrash High CPU & How to Disable reportcrash in Mac OSX
For a while now, all of my MacBooks have run extremely hot and the fans have gone nuts. While troubleshooting the issue, Activity Monitor showed that an app named reportcrash has run very high on the CPU and has killed my battery life. Force quitting the app didn’t help as it would start right back up in a few seconds and climb back to 80-100% usage of the CPU.
What is CrashReporter?
CrashReporter runs in any time an application crashes and it’s designed to saves the application state to aid developers in working out why the app crashed. Basically a process is launching, crashing (and invoking CrashReporter) and then re-launching, repeating this cycle never ending.
How to Identify What’s Crashing
To show which process is triggering this cycle and stop it, CrashReporter is pretty verbose in its logging which makes finding the problem app somewhat easier. Open up the console.app (/Applications/Utilities/Console.app) and look towards the end of your system.log to see what app is crashing.
Unfortunately for me, the problem is a driver by some company called EFI and getting the latest drivers didn’t resolve the issue. The next obvious solution was to disable reportcrash.
How to Disable ReportCrash
Fire up terminal and run the following commands to disable reportcrash:
launchctl unload -w /System/Library/LaunchAgents/com.apple.ReportCrash.plist sudo launchctl unload -w /System/Library/LaunchDaemons/com.apple.ReportCrash.Root.plist
How to Enable ReportCrash
If you need to reenable crash report, run the following commands in terminal:
launchctl load -w /System/Library/LaunchAgents/com.apple.ReportCrash.plist sudo launchctl load -w /System/Library/LaunchDaemons/com.apple.ReportCrash.Root.plist
Cheap Macbook Pro Docking Solution for about $30
I typically prefer developing on my desktop and large dual screen monitor setup as opposed to my Macbook. Recently, I’ve gotten into more PHP development and developing on the Mac is proving to be a more enjoyable experience only because Windows is still a second class citizen for most PHP libraries/tools. I still wanted a larger screen setup, so I considered buying a docking station to hook up to a larger monitor but I soon learned they feature the ‘Mac Penalty’ in that they cost more than they should just because it’s for Apple products.
I already have two large monitors and figured my Macbook could serve as third screen. Then I did some thinking and realized I could use one of the monitors for both computers. Assuming you have two HDMI screens already hooked up to your desktop, this would save you $150+ and still allow you to be more productive.
- Get a copy of Synergy (http://symless.com/) for $10. It’s open source and can be built if you have the time, but a one time fee of $10 saves me the hassle of doing so. With this, you can share your desktop keyboard across all your computers with the one license and it’s cross platform so Linux support is included too.
- Purchase an auto HDMI switcher. I purchased the PORTTA PET0301S 3×1 Port HDMI Switch/Switcher for about $9.
- Be sure to get 2 HDMI cables if you don’t already have them on hand. I don’t like the Amazon Basic brand for these as I’ve had problems with the Mac and those cables hooking up to larger screens.
- Install Synergy on the desktop as a server. Install on the Macbook as a client and it should autoconnect.
- Plug the HDMI cable from the computer into the HDMI switcher, and plug the spare into the Macbook pro. Plug the “Out” end into the monitor.
When you plug your HDMI cable into the Macbook, the HDMI switcher will automatically switch to it and project the Macbook. Synergy will auto-connect as long as it’s running on both and you can share the mouse and keyboard between both and work seamlessly.
If you have an iPad and want to turn that into an additional screen, grab a copy of Duet Display on your desktop/Macbook and install on your iPad for $15.99, and viola, instant portable second screen!
How to repair permissions on Linux Apache /var/www/html folder
I recently ran into an issue where I could no longer FTP files to my Linux droplet when multiple users were uploading to the server. The server kept the user as the owner despite me adding them to the www-data group. This fix comes from my ex-boss, James Tomasino who was kind enough to provide some help since I was stumped. I’m sharing in case anyone else runs into the same issue and finds it useful.
You’ll need to fire up terminal, ssh to the server, and then execute these commands:
cd /var/www sudo chmod 775 html sudo chgrp www-data html sudo chmod g+s html
+s makes permissions sticky so that all files will inherit from the parent directory. This was the setting I was missing.
Open up /etc/ssh/sshd_config. I use nano so:
sudo nano /etc/ssh/sshd_config
Hit CTRL+W and look for “subsystem” which is typically located near the bottom of the file. Change
subsystem sftp /usr/lib/openssh/sftp-server
to
subsystem sftp /usr/lib/openssh/sftp-server -u 0002
If you already have files in the HTML folder, you’ll want to run these commands to reset the permissions:
cd /var/www/ sudo chgrp -R www-data html find . -type f -exec chmod 664 {} \; find . -type d -exec chmod 775 {} \;
(98)Address already in use: AH00072: make_sock: could not bind to address [::]:80 – error
IÂ recently got handed a new Ubuntu droplet at work to setup and work on. I was going through the typical configuration to lock down the server and go to installing Apache when I suddenly ran into the error
(98)Address already in use: AH00072: make_sock: could not bind to address [::]:80 – error
I was a little surprised considering I had only run 4 commands total on a brand new installation. If you’re getting this error like me, you’ll need to find out what’s being bound to port 80 and then stop it. Use this command to get a list of anything that’s running on port 80.
sudo lsof -i:80
For me, it turned out nginx was running and bound to port 80. If you have the same problem, run this command to stop it:
sudo service nginx stop
Now you should be able to start apache.
How to Copy and Paste into the Digital Ocean VNC Console
I recently signed up for Digital Ocean to test droplets for my development and linux management testing. I was securing the server and setup fail2ban, disabled the root login, and created a user account but forgot to change the user name from root to the user name I selected in my SSH client profile. I ended up locking myself out of the server and had to resort to logging into the admin panel on Digital Ocean’s website and use their browser embedded VNC client to restore my access. I quickly discovered that one of the downsides of using this panel is that you can’t copy and paste commands. Luckily there’s a workaround and you can use the browser console to do sendkeys through Javascript.
Bring up the console in the browser developer tools. Here’s a cheat sheet for keyboard shortcuts:
Browser | Description | Windows | Mac |
---|---|---|---|
Chrome | Open Developer Tools and bring focus to the console | Ctrl + Shift + J | Cmd + Opt + J |
Firefox | Open Console | Ctrl + Shift + K | Cmd + Opt + K |
Internet Explorer | After hitting F12, you have to click the console tab. There’s no direct shortcut to the console tab. | F12 | N/A |
!function(){function t(){window.rfb.sendKey(e.shift().charCodeAt()),e.length>0&&setTimeout(t,10)}var e=prompt("Enter text to be sent to console").split("");t()}();
Update 9-21-16
Ruden and Sebastiaan’s pointed out there was a bug in the code above. This updated snippet has support for characters when using shift characters like !@#$%^&*()_+
!function(){function t(){function n(t,e){s=s.concat(RFB.messages.keyEvent(t,e))}var o=e.shift(),s=[],i=o.charCodeAt(),c=-1!=='!@#$%^&*()_+{}:"<>?~|'.indexOf(o),r=XK_Shift_L;c&&n(r,1),n(i,1),n(i,0),c&&n(r,0),rfb._sock.send(s),e.length>0&&setTimeout(t,10)}var e=prompt("Enter text to be sent to console").split("");t()}();
You’ll receive a dialog prompt to enter the copy to paste in. Please note that you need to click on the VNC console and hit enter to execute the command.
If you need to enter more than one command, just hit the up arrow on your keyboard in the console to get the script again for easy reuse.